Navigate360 for Students

Navigate360 is your go-to tool for staying on track throughout your college journey. Use it to schedule appointments, join study groups, connect with campus resources, view your holds, and more!
- Download the Navigate Student App on the App Store or Google Play Store. You can also access Navigate360 directly.
- Log in using your CUNYfirst login credentials. That is fistname.lastname00@login.cuny.edu, with the last two digits being the same as the last two of your EMPLID. The password is the same as the one you use for CUNYfirst.
- Make sure to enable push notifications to receive upcoming reminders!
Transfer Students: If you used the Navigate360 Student app at your previous school, you may need to log out of the app and select 'Change Schools’ to switch to John Jay College.
Use the 'Appointments' tab to schedule appointments with staff members! There are multiple ways to schedule appointments:

-> Schedule an Appointment
Tap 'Schedule an Appointment' to find available times at different offices on campus (Advising, Career Learning Lab, Tutoring, Financial Aid, etc.) Select the type of appointment/service you would like to schedule accordingly to find options that match your needs!

-> Schedule Through an Appointment Invite
Sometimes, staff might directly invite you to make an appointment, this is called an ‘Appointment Invite.’ Whenever you get an invite, you will also receive one or more emails with more information about the appointment, and whether it is mandatory or optional.
You can also find all your Appointment Invites on the app:
- Go to the 'Appointments' tab.
- Scroll down until you see your ‘Appointment Invites’.
- Select the invite you wish to make an appointment for.
- Review the details, then tap ‘Find Time Availabilities’.
- Select an appointment date and time.
- Review your selection.
- Click ‘Schedule'.
-> Drop-In For a Meeting
Some offices offer drop-in appointments where you simply come in, without having an appointment already scheduled. These can be either in person or online.
Virtual Drop-Ins
For virtual drop-ins, open the 'Appointments' tab. Select 'Schedule an Appointment.' Under ‘Other Options,’ select ‘View Drop-In Times’ and select the office you want to meet with. Once you’ve made your selection you will see any relevant information for drop-in sessions, such as a Zoom meeting link.
In-Person Drop-Ins
For in-person drop-ins, you will see a Kiosk set up either on a tablet or computer when you enter the office. Here, type in your EMPLID number.
- If you’re checking in for an event, that’s all you have to do!
- If you’re checking in for a 1-1 appointment, you will be prompted to choose to ‘Wait for a Specific Person’ or ‘Wait for the First Available Person.’ Once you’ve made your selection, you will be added to the queue and be seen as soon as possible by a staff member.
-> Canceling an Appointment
- Go to the ‘Appointments' tab, and under ‘Upcoming’ select the appointment you would like to cancel.
- Scroll all the way down and click ‘Cancel Appointment,’ you can also select a reason for the cancellation from the drop-down menu or enter a comment.
- Click ‘Cancel Appointment’ again to confirm.
The Hand Raise feature allows you to virtually "raise your hand" to ask for more information or support in a specific area, such as tutoring or financial aid. Additionally, some Hand Raises will alert staff, who will then reach out to you to offer more assistance directly.
-> How to Create a Hand Raise

- Open the 'Hand Raise' feature.
- Select 'Create a Hand Raise.'
- Select your Hand Raise reason (Optional: Add a comment for staff).
- Tap 'Hand Raise' to confirm.
After your raise your hand, please keep an eye on your emails for more information.
The ‘Holds’ page shows any holds currently on your account. Click ‘View Details’ to find more information about a hold, instructions on how to clear it, and resources that may be helpful.
Some holds can prevent you from being able to register for the next semester, so make sure to plan and resolve them before registration opens!
Note: It may take up to 24 hours for any hold changes to be reflected on your account
.

On the ‘Resources’ tab you can find a list of offices and programs at John Jay College that you can reach out to for support!
- Under ‘Places’ you will find several categories, select any to find a list of corresponding resources.
- You can also use the search bar to find a resource you know directly by name.
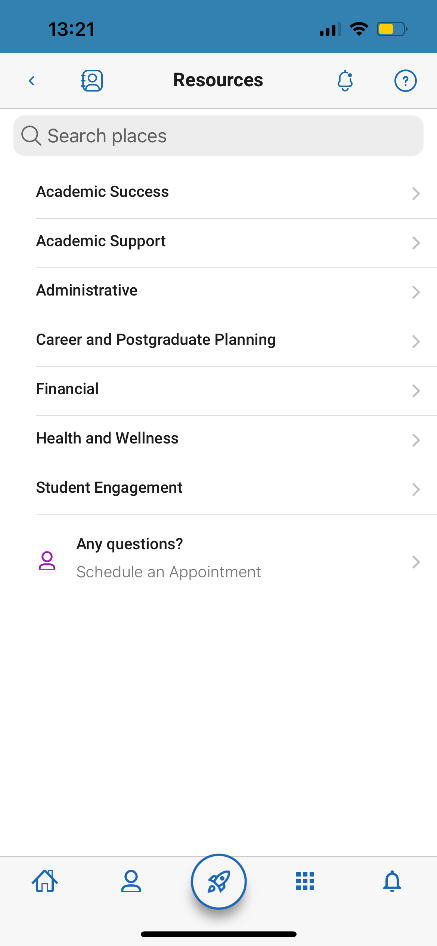
Click on any resource to find more information about it, such as their email, website, phone, or location.
- TIP: Tap on the heart icon to favorite a resource so that they are easier to find in the future. All your favorites can be quickly accessed from the main menu’s rocket button.
Journeys guide you through important steps like completing financial aid, planning your classes, or preparing for your career. Staff might assign you a Journey, but you can also explore and add your own! New topics are added throughout the year, so check back every so often to see what’s new.
-> How to Add a Journey

- Open the ‘Journeys’ feature on the Navigate App. The main Journeys page displays any current Journeys you have assigned. Beneath that is a section for completed Journeys.
Click ‘Explore All Journeys’ to find and add any journeys you are interested in. You can filter based on the Journey Name or Topic.
Image
Once you select a Journey from the list, you will see a description and the steps that comprise it. Click ‘Add Journey’ to add it to your list! You will then be able to follow its steps and track your progress.
Image
Join Study Buddy groups to connect with your classmates and get help with homework, study for exams, and share study materials.

- On the ‘Study Buddies’ tab, you’ll see a list of all class sections you are currently enrolled in. Select the section you want to join a study group for and click ‘Join’.
- After joining, you will see a list of peers who have also joined that group. You have the option to email all or some of those classmates.
- TIP: You can enter or leave a Study Buddies group at any point in the semester.
On your homepage, you will see a notification for any classes or events you have happening today. Click on ‘View Details’ to see more information about it.
-> Class Schedule
On the ‘Class Schedule’ tab, you’ll find information about any classes you are currently taking. This includes class title and description, your instructor's information, and meeting times and location.
- Select ‘Schedule View’ to see a visual representation of your classes. Any asynchronous courses will be displayed as a bar across the top of the calendar.
- Want to look at next semester’s schedule? From your ‘Class Schedule,’ select the filter icon on the top-right corner. Then, select the semester to view information on classes you have registered for that term.
-> Calendar
Use the ‘Calendar’ feature to view your calendar, including your classes and any major campus events. Important campus dates and deadlines will appear here!

TIP: Your homepage will also feature an ‘Announcement’ section containing information when key deadlines (such as registration dates or add/dop dates) are approaching!
Notifications are important reminders or messages sent to you as a push notification, email, or text. You can configure the type of notification sent for different features depending on your needs and preferences.

- To configure your notifications, open your ‘Account,’ then click ‘Notification Settings.’
- For each feature, you can edit your notification preferences. Select as many notification methods as you want, but keep in mind you’ll receive multiple notifications if you choose more than one.
- If you select the Text option, make sure that your cell phone number is accurate under the 'Contact Information' at the top of your screen!