Create a Brightspace Quiz
Brightspace allows instructors to create online quizzes to gauge student mastery of course materials and learner engagement. Quizzes can contain various commonly used question types, can include questions from a question pool, and shuffle the presentation order of questions. Delivery options allow instructors to limit access to the quiz to a particular timeframe and to set time limits for completion once a quiz has been started by a student.
Access Quizzes
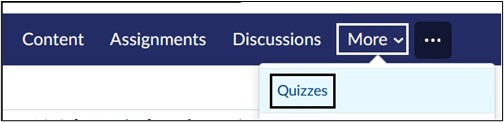
- Enter your course and select Quizzes on the Course navbar.
Note: A new Quiz can also be created on the Content page within a Module. Select Upload/Create button and select New Quiz from the drop-down menu. Quizzes created on the Quizzes page can be added to modules by selecting the Existing Activities button.
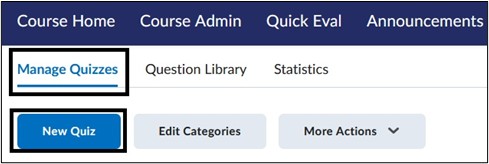
- On the Quizzes page, under Manage Quizzes, select New Quiz.
- On the New Quiz page, enter the quiz information.
- Enter a Quiz Title. We recommended concise titles that do not include dates to reduce the amount of editing needed when copying a course.
- By default, quizzes are set as Not in Gradebook. To add a quiz to the Grade Book, select the downward arrow and select Add to Gradebook. You can then specify the overall points for the quiz.
- Enter a Due Date for the quiz, if applicable.
- Enter a Description for the quiz. The HTML Editor appears which will allow you access to the Insert Stuff button and other editing functions.

Create a Quiz Question
- Select Create New. Select New Question.
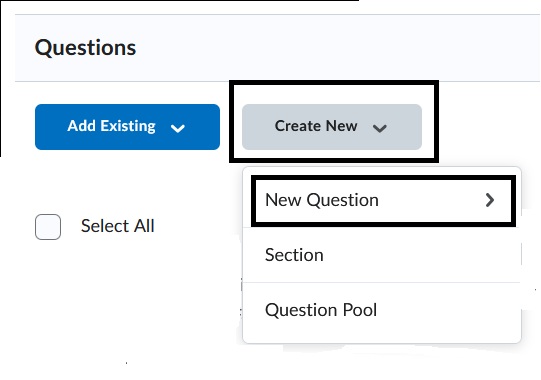
2. Select a Question Type.

Watch a brief (1:40 mins.) Question Types video for an overview of question types.
3. A pop-up box will appear for the selected question. In this example, it is displaying a Multiple-Choice Question. Enter the question in the Question Text box. Enter the answers in each answer box. Select the correct answer by selecting the circle to the left of the specific answer.
Select the Options drop-down in the upper right to access additional settings for the Question Type. Select Save once the question is completed.
Image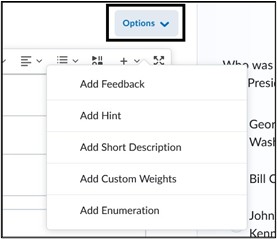
Note: The Options drop-down menu will display selections based on the specific question type chosen.
Edit a Quiz Question
Note: It is highly recommended to make changes to questions before students have taken the quiz. Editing questions after students have taken a quiz will NOT update their attempt. Changes will only impact future attempts.
To edit a quiz question, click on the question.
Image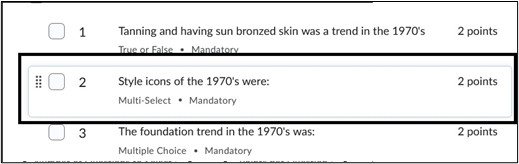
- An Edit Question box will appear to allow you to make changes. Make sure to select Save once changes are complete.

Additional Question Settings
- To access additional quiz settings, select a quiz question by checking off the square box to the left of question. The Move To and More Actions options will be available.
- The Move To drop-down menu allows you to move questions around within the quiz. You also can drag and drop questions into place.
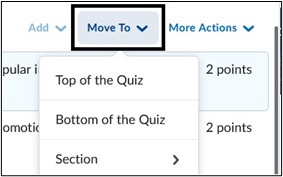
The More Actions drop-down menu provides access to these additional settings:
- Delete questions.
- Toggle Bonus – denotes the question as Extra Credit.
- Toggle Mandatory – sets the question mandatory to answer. The students cannot submit the quiz until an answer is selected.
- Set Points allow you to change point value for a particular question(s).

Availability Dates & Conditions
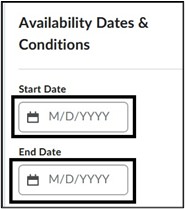
- Set a Start Date and an End Date for the quiz. The Start and End Date is the timeframe during which students may start the quiz. Start and End dates are independent of the time limit for the quiz, which sets the allowable time for a specific quiz attempt. Students who begin the quiz and who have time remaining on the quiz timer will be allowed to complete the quiz, even if the End Date has occurred. If no Start and End dates are set, the quiz will be set to “Always Available” unless it is hidden from view on the Manage Quizzes page.
Release Conditions allow instructors the ability to set criteria for access to a quiz, such as completing a prior assessment or a specific task within the course. Select Add Release Conditions. Select Create New or Add Existing if you have created previous criteria. For more information access Release Conditions.
Image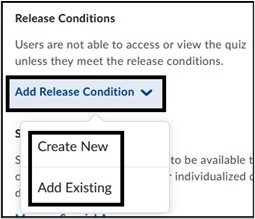
- Special Access allows instructors to modify quiz settings for specific students. Special Access can be used if a student has testing accommodations or a student needs to take the quiz at a different date or time than the rest of the class. Select Manage Special Access to set these options.

- On the Special Access page, select the specific restrictions and select Add Users to Special Access.
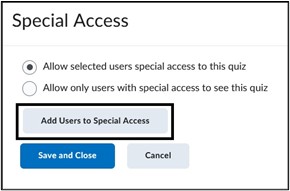
Note: By default, “Allow selected users special access to this quiz” is the chosen option. This allows you to set access for specific students while not impacting other students for the same quiz. The second option will restrict the quiz to ONLY those students who are selected for Special Access.
Special Access for quizzes can set:
- Different Due Dates and Availability Dates for a user.
- Override the Time Limit and add additional time or no time limit for user.
- Override attempts allowed. This setting is only available in Quiz Special Access.
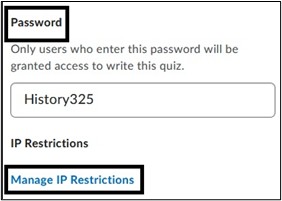
- Instructors can set a password for a quiz. Note that passwords in Brightspace for quizzes are case-sensitive. Additionally, instructors can restrict a quiz based on an IP Address. ODL LMS Support does not recommend using this option unless all computers are within the same location or network, such as a designated computer lab on campus.
Timing & Displays
- Set a Time Limit for a quiz. Select Timer Settings for additional timer settings.

Access Timer Settings for more information.
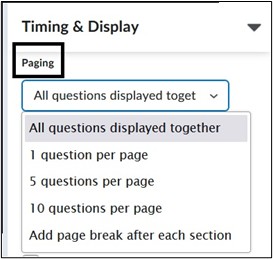
- Under Paging, select how the questions will be displayed. By default, all questions will be displayed on one page unless a different option is selected. If a certain number of questions are chosen per page, there is the option to select Prevent going back to the previous page under the selection.
- The Shuffle quiz selection will randomize the order of questions presented to each student during a quiz. Please note that if you are using Sections and want the questions to remain within those sections, do not use this feature but rather Section shuffling within the Section settings.

- Under the Display option, the Allow Hints option can be selected. The hints must be set up within the quiz questions. The Disable Email, Instant Messages and Alerts within Brightspace option is enabled by default. Instructors can apply a header and footer to their quiz which will display at the top and bottom of the quiz page.

Note: As of Spring 2024 semester, the Instant Message tool has been disabled in Brightspace.
Attempts & Completion
- Select Manage Attempts to set the number of attempts for a quiz. By default, quizzes are set to 1 attempt. Click the Manage Attempts link to add additional attempts.
- Under Category, categories can be assigned or created to organize quizzes on the main Quiz page. Use the drop-down menu to select or create a new category. Note that categories listed here are not connected to Grades, only for organizational purposes within Quizzes.

- Under Notification Email, this setting allows you to enter an email to receive notifications when students have submitted their quiz. A separate email is sent for each quiz attempt, for each student.

- Under Completion Tracking, select Manage Completion Tracking to choose how the completion status is marked once a student has completed the quiz. By default, the student is marked as complete after submitting a quiz attempt.
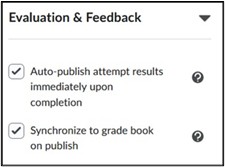
Evaluation & Feedback
- Under Evaluation & Feedback, select how scores and feedback are released to students. Select Auto-publish attempt results immediately upon completion to release scores to students as soon as the quiz is submitted. If questions cannot be evaluated by the system (e.g. written response questions), those questions will be automatically scored with a zero until manual evaluation. This setting is checked off by default. If it is deselected, attempt grades will have to be manually published on the Quiz submission page.
- Select Synchronize to grade book on publish. This means that scores will automatically be sent to Grades. If you are not seeing scores within the grade item on the Enter Grades page, make sure this box is selected within the quiz settings. Selecting this option again, if it was previously deselected, will also require scores to be manually published on the Quiz submission page.
- Select what is displayed to students after submission. Under When published, display to learners, Attempt Grade is selected by default. Instructors can select additional feedback such as Incorrect and Correct Answers to display. Selecting Customize Quiz Results Displays allows instructors to release additional information to students after initial results.
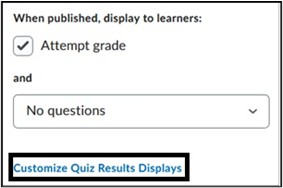
Access Customize the Quiz Results Displays for more information.
Important Note
- Make sure once you save the quiz that it is toggled from Hidden to Visible for students to be able to access it. Note that even if you set a Start/End Date and the quiz is hidden, it will not be visible to students! The Hidden setting overrides all other date/time restrictions!

Access Create and configure a quiz for more information.
View Create a Quiz Video:
For more information and assistance, please email Office of Digital Learning - Learning Management System Support at LMS.faculty@jjay.cuny.edu