Creating a Demo Student in Brightspace
Instructors can create a demo student to view the course as a student would. As a demo student, instructors can interact with the course by completing quizzes, viewing content, submitting assignments, and checking grades and feedback.
Important Notes –
- A demo student is associated with an individual course.
- Only one demo student account can exist in a course at one time.
- Demo students should be deleted once instructors have finished previewing the course so as not to affect report functionality or grade data.
- Students do not see the CUNY Demo Student listed on your course navbar.
- The demo student will not work with some third-party LTI-linked tools like VoiceThread and publisher materials. The account will work with the Turnitin LTI and the Brightspace Turnitin Integration (v2) as well as PlayPosit and Perusall.
The CUNY Demo Student link will show in all courses that currently use the John Jay Default navbar. If you do not see the CUNY Demo Student link under More or have created a new course navbar, you will need to add the CUNY Demo Student link manually to your navbar.
- In the course, select Course Admin on the course navbar.
- Select Navigation & Themes.
- Click on the navbar name in blue that is set as Active.
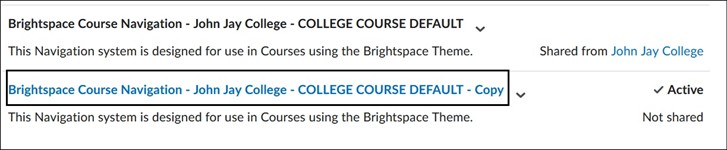
- On the Edit Navbar page, select Add Links button.
- Scroll down to CUNY Demo Student > Select the box to the left of the link name and select Add. Select Save and Close to hold changes.
Create a Demo Student
- In the course, select More on the course navbar. Select CUNY Demo Student on the drop-down menu.
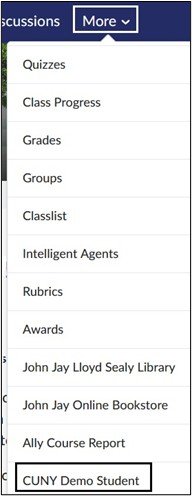
- Select Create Demo Student.

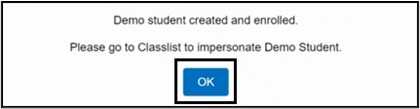
- A pop-up box will display stating that the demo student has been created. Select OK.
Accessing CUNY Demo Student
- On the course navbar, select More > select the Classlist tool.

Note: If you have removed the Classlist tool link from the course navbar, select Course Admin > Learner Management > Classlist. If you do not see the Classlist on the Course Admin page, this means the tool has been turned OFF. To turn this tool ON, select Tools under Administration on the Course Admin page. Toggle the Classlist tool to ON and return to the Course Admin page to access the link.
- On the Classlist page, find the Demo Student. Depending on how you have the student names sorted it could display as Student, Demo. The Demo Student’s username will appear as demo_student_ {Course Unit ID} and will display as the author name for any submitted assessments.

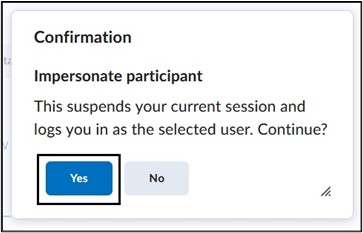
- Select the drop-down arrow to the right of the name and select Impersonate.

- A pop-up box will appear asking for confirmation to impersonate the participant. Select Yes to continue.
Once within Demo Student, the account’s name will display in the upper right corner replacing your name. You can now view the course as your students would, take quizzes, submit assignments and view content.
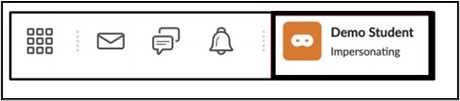
- Once you have finished previewing the course, select the Demo Student in the top right corner. From the dropdown menu, select the X to the right of Impersonating: Demo Student to return to Instructor view.

It is recommended that when you have finished using the demo student, that you delete the account so that it does not interfere with reporting functions or grade data.
Note: Deleting the demo student will delete all work submitted such as assignment submissions and quiz attempts, except for discussion posts. The discussion posts remain but the author will appear as “anonymous” rather than the demo student name. Instructors will need to manually delete any demo student discussion posts.
Delete Demo Student
- Select More on the course navbar. From the dropdown menu, select CUNY Demo Student.
- Select Delete Demo Student.

- A pop-up box will appear, asking if you wish to proceed in deleting the demo student. Select Delete Demo Student. A pop-up box will confirm the demo student was deleted successfully. To use the Demo Student again, please repeat the steps above under Create Demo Student.

For more information and assistance, please email Office of Digital Leaning - Learning Management System Support at LMS.faculty@jjay.cuny.edu
Adapted from SPS Teaching Guide page, CUNY Demo Student Tool and used with permission.
Adapted from CUNY FAQs page, CUNY Brightspace Transition FAQs and used with permission.