Create Grade Categories and Grade Items
Grade Categories can be created on the Manage Grades page to help organize multiple grade items under a category header. Categories are used more often in a Weight Grade System where a specific weight percentage is applied over multiple grade items.
A Grade Item is an individual column in the gradebook that stores the grade for a specific activity or assessment. It can be linked to an actual assessment in Brightspace, for example a quiz or an assignment, or it can be a standalone (manual) item.
When an assessment is created like an Assignment, Quiz or Discussion Topic, it can be set to In Grade Book. This will automatically create a grade item in the Grade book which will be associated with that assessment. Attempts and scores will then be sent to the Grade book for that specific Grade item.
Access Grades
In the course, select More on the Course navbar. Select Grades from the drop-down menu.
Image
- On the Grades page, select Manage Grades.

Create a Grade Category
- On the Manage Grades page, select New. Select Category.

- Enter a Name for the Category. A Short Name can be entered which will display on the Enter Grades page for that item.

Under Grading, if using a Weighted Grade System, a Weight Percentage can be entered for the Category. For example, all Discussions in your course would be worth 25% of the Final Grade. Under Distribution, you can choose how you would like that percentage to be distributed. Most instructors select Distribute weight evenly across all items. You can also select the highest or lowest number of items to be dropped. For example, enter 1 in the Number of lowest non-bonus items to drop for each user to drop the lowest scored discussion post for each learner.
Image
Note: The Weight Percentage field will only display if you have set your Grade book to a Weighted Grade System.
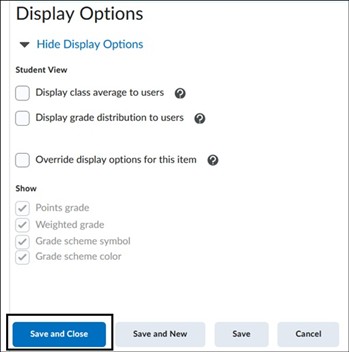
- Under Display Options, select what view the learners will see on their Grades page. Select Save and Close to complete.
Assigning Categories to Grade Items
A quick way to view and assign created categories is through the Manage Grades page using the Bulk Edit function.
- On the Manage Grades page, choose the Select All box. Select Bulk Edit.

- Under the Category column, select the drop-down menu and apply the category for that specific item. Select Save to hold changes.

Note: Categories can also be assigned within each individual grade item on the Manage Grades page.
Create a Grade Item
- On the Manage Grades page, select New. Select Item.

On the New Item page, under Choose a Grade Item Type, select the type of item you would like to create. John Jay LMS Support recommends selecting Numeric as automated grade items are created as such. The Text, Pass/Fail and Calculated grade item cannot be associated with an assessment nor are they included in the Final Grade calculation. John Jay LMS does not recommend using these grade items for that reason.
Image
On the New Item page, under the Properties tab, enter a Name for item. A Short Name field can be used that will appear on the Enter Grades page.

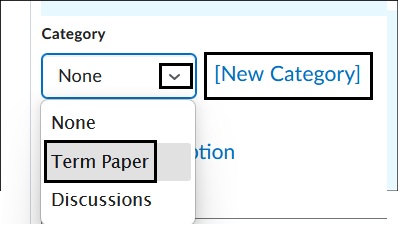
- A Category can be assigned or created for the item. Typically, a category only needs to be assigned or created if multiple grade items are assigned for that category. For example, if you have one Final Exam, you will not need a Final Exam category as well since it is one item.
- Under Grading, set a Maximum Point for the grade item. Note that the Weighted Percentage field will only show if your course is set to Weighted Grade System.

- Additional Grade settings for an item can be set to Can Exceed, which means that when selected, a learner can be granted a score higher than the Max points. Setting a grade item to Bonus will make that grade item extra credit. Under the Grade Scheme, a specific grade schema can be set. By default, the John Jay Undergraduate Schema for Final Grades will be set. A rubric can be tied to a specific grade item.

Access Verify Grade Schema in Brightspace for more information.
- Under Display Options, select what can be seen by the learner and on the instructor’s gradebook page for the specific item. Select Save and Close to create the grade item.

Note: The Managing View refers to an instructor’s view in the Grade book.
8. Select Save and Close.
For more information and assistance, please email the Office of Digital Learning - Learning Management System Support at LMS.faculty@jjay.cuny.edu